11 May, 2015

OPI SOFT SHADES COLLECTION 2015 - SWATCHES & REVIEW

Nail the nude look with OPI's new 2015 Soft Shades collection.
OPI bring the richly pigmented formulas you love to the season’s hottest nude nail trends, 

“Soft Shades nail lacquers make a very powerful statement by being enticingly feminine with a delicate hue”

These pastel hues are the perfect way to lighten up your spring style by adding a nice and subtle hint of colour to your nails appropriate to wear all year round. 


Today i have a review on three of the six polishes from this collection to share with you!


PUT IT IN NEUTRAL "I'm driven to get my hands on this pinkish beige" - OPI
Put it in Neutral is a delicate dusty pink toned nude nail polish shade.

This polish is not a straight up cream formula, it's more of a jelly like polish and looks squishy (but not in a bad way).

This polish was really easy to work with - It's easy to apply, it wasn't streaky or patchy and it self-levelled really well. 

It is really sheer but that is the nature of the polish - It's supposed to have a sheer finish.
The formula of this polish is really sheer but is not too thin, which makes it easy to build up to opacity with enough coats of polish. Building up the colour with multiple coats was not an issue in terms of pooling on the side of your nails and dry time. I found that it actually dried relatively quickly in between layers and your nails don't look too thick with nail polish. It's a very flattering polish on the nail.  

This kind of polish is supposed to be worn with about two coats of polish for a natural look where you can still see visible nail line. 
I am personally not a huge fan of this look and prefer it to be relatively opaque, so i found that about four coats gets it to look opaque enough for my liking. With four coats of polish you can really see the true beauty and colour of the polish - it's so beautiful. 


THIS SILVER'S MINE!  "I totally dig this pearly silver" - OPI
This Silver's Mine! is a very unique rose gold toned silver / champagne nail polish shade with a pearly frost like finish. It's a gorgeous shiny eye-catching colour.

The formula of this polish is perfect. It's easy to apply, it wasn't patchy and it self-levelled really well. It is quite opaque in one coat but needs two thin coats of polish to reach full opacity. 

This polish, like most typical metallic nail polishes, leaves noticeable brush strokes with each nail polish swipe on the nail. Adding topcoat will not help remove the streaks. 
The strokes don't bother me too much but there are ways to eliminate the strokes / make them not as noticeable. I suggest:
  • Sponging the second coat of polish onto the nail with a makeup sponge
  • Using a matte topcoat directly over the first coat of polish and apply a second coat of the polish directly over the topcoat - this is the method i used in my swatch and found it worked pretty well.
Streaky or not i am in love with this polish!


ACT YOUR BEIGE!  "Age is just a number, but this light beige is #1"  - OPI
Act Your Beige! is a pink toned beige nail polish shade.

It's formula is very similar to 'Put it in Neutral' but it's a little more sheer.
It's not a straight up cream formula, rather it's more of a jelly like polish and looks squishy (but not in a bad way).

This polish was easy to work with - easy to apply, it wasn't streaky or patchy and it self-levelled really well.

It is really sheer but that is the nature of the polish - It's supposed to have a sheer finish.
Although this polish is sheer it's not too thin, which makes it easy to build up to opacity with enough coats of polish. Building up the colour with multiple coats was not an issue in terms of pooling on the side of your nails and dry time. I found that it actually dried relatively quickly in between layers and your nails don't look too thick with nail polish. It's a very flattering polish on the nail.  

This kind of polish is supposed to be worn with about two coats of polish for a natural look where you can still see visible nail line. 
I am personally not a huge fan of this look and prefer it to be relatively opaque, so i found between four - five coats gets it to look opaque enough for my liking. With five coats of polish you can really see the true beauty and colour of the polish - it's so beautiful. 


*  *  *

I'm totally digging these polishes.I don't usually gravitate towards these kind of colours but i am obsessed with these.There is just something different and delicate about these shades. 
I would actually be quite content to wear these weeks on end.

Definitely recommend picking up all three of these shades! 


*  *  *
RRP: $19.95 each (AUD)

Available in April 2015 at selected Myer and David Jones stores and selected Salons nationally (Australia)
For details on retail stockists please call 1800 812 663
For details on salon enquiries please call 1800 358 999

*  *  *
*Disclaimer: CotyPR Australia kindly sent me these products for an honest review. All opinions expressed in this blog post are mine based on what i have experienced through trialling these products.

Thanks for taking the time to read this
Have a great day 
Doni xxx


Find me on:
Instagram ~ @donsnailobsession
Twitter ~ @donsnails

22 April, 2015

SALLY HANSEN MIRACLE GEL "GAME OF CHROMES" NAIL COLOUR - SWATCH & REVIEW

Get salon quality nails in two easy steps with Sally Hansen's Miracle Gel  nail polish.

Miracle Gel is a revolution in gel technology, with it's part-lacquer, part-gel formula. 

Get the lasting results of a gel manicure without the hassle. Miracle Gel polish promises up to 14 days of Colour and Shine - delivering a high shine, glossy look just like a salon quality manicure.  


Miracle Gel is a two-step gel manicure that does not need to be cured by UV / LED light - so its less damaging to the nail. It applies just like regular nail polish.

How to use ~
STEP 1: Apply two coats of the Miracle Gel nail colour of your choice. No basecoat needed.
STEP 2: Activate curing of the polish with one coat of the Miracle Gel Topcoat.


Sally Hansen Miracle Gel polishes have the same amazing wide brush just like Sally Hansen's Complete Salon Manicure range; making application of the three-stroke method a breeze.


Sally Hansen Australia have just released five new shades including US best sellers.

Today i have a  review on US best seller 'Game of Chromes' to share with you.

GAME OF CHROMES
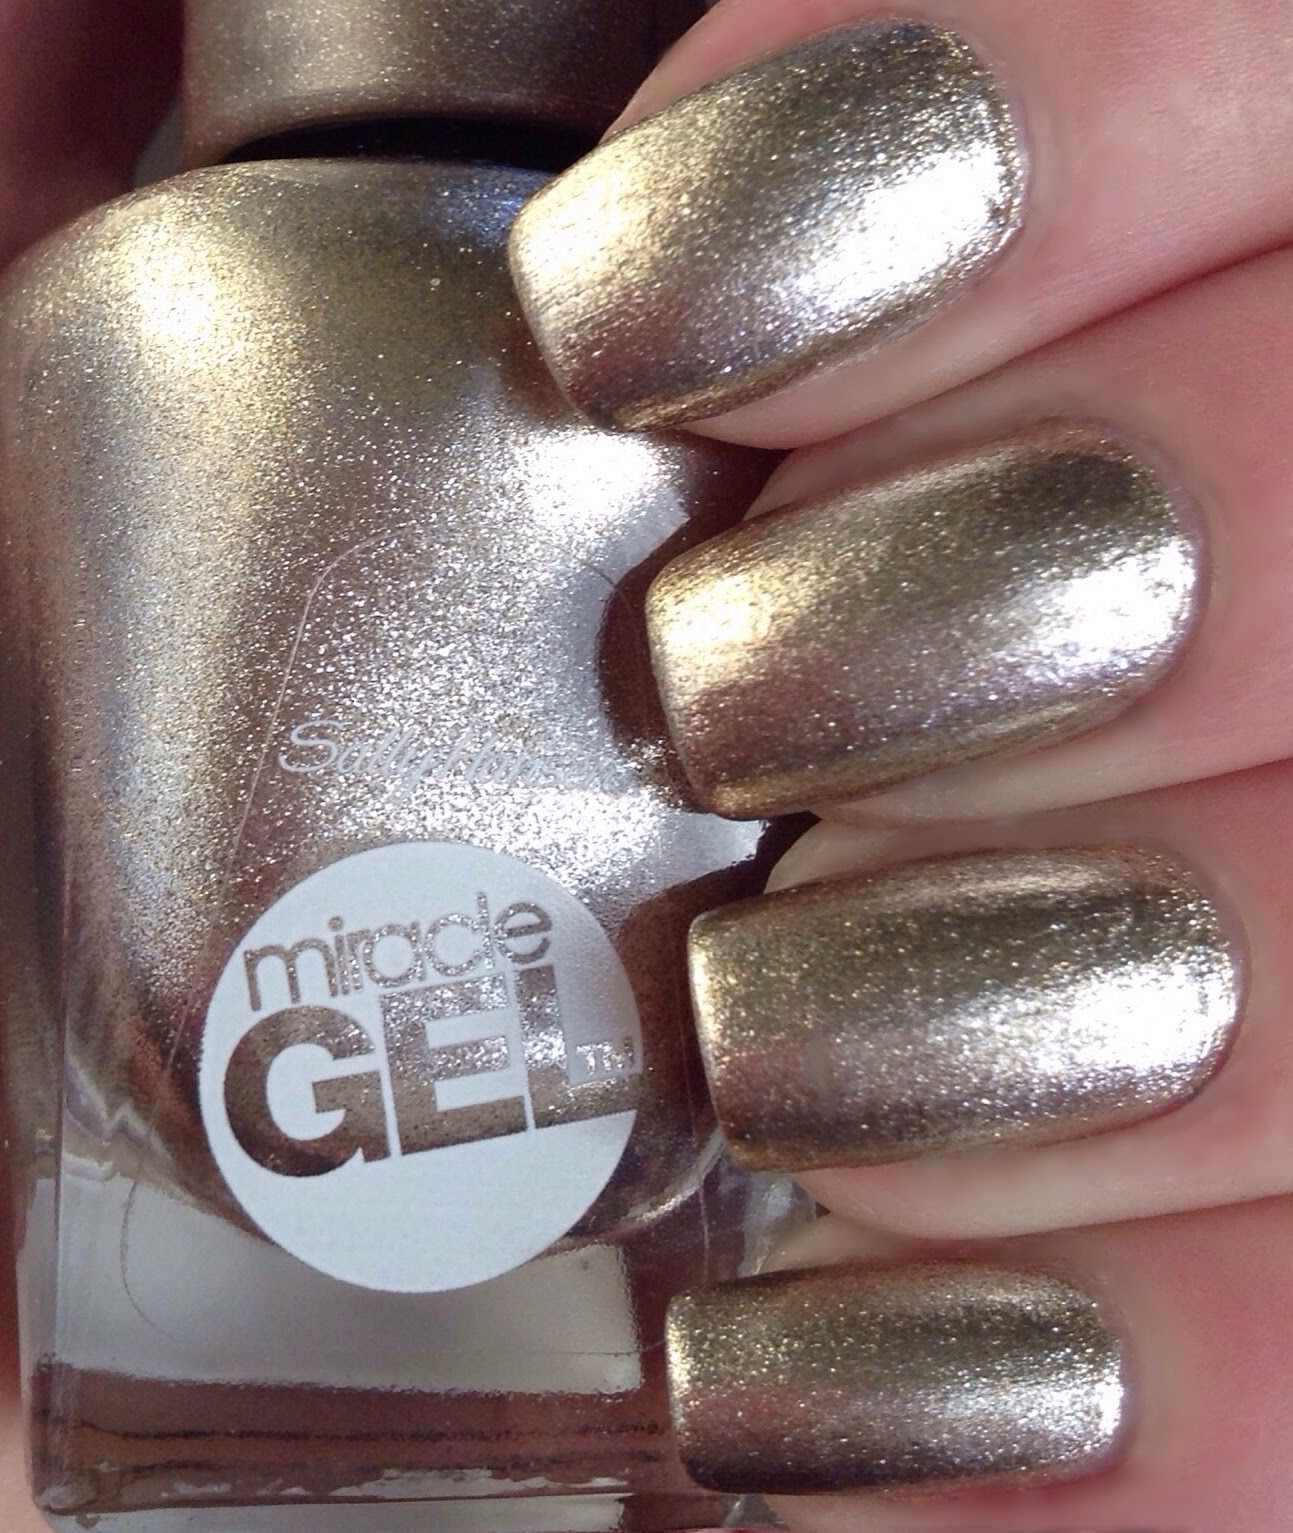
Game of Chromes is a GORGEOUS metallic gold foil polish. It seriously looks like you've dipped your nails in liquid gold! Absolutely STUNNING!!
This polish appears to be made up of gold and silver shimmers - 
to me indoors, the polish looks like a definite gold colour, but in direct sunlight, you can kind of see a shimmery duo-chrome look to it, with a gold to silver kind of shift.

I've only had this polish for a couple of weeks and I've already worn it three times! That's a record for me.
I am seriously OBSESSED with this shade! 
I am drawn to anything shiny and metallic, so i knew this would be a polish i'd love!

The formula of this polish is perfect! It is slightly thicker then normal polish but it's still a dream to work with. It's nice and smooth and easy to work with - it effortlessly glides onto the nail. It's also not streaky, unlike other metallic polishes. 

It needs two coats of polish to look fully opaque. There's nice and even coverage with each coat and it self-levels really well with each coat of polish. 

The polish wears pretty well. I didn't wear the polish for 14 days to test Sally Hansen's claim but i did have it on for a full week. The polish only suffered some tip wear (which is to be expected). Other then that i had no major chips and the polish shine didn't turn dull. Really impressive. I couldn't stop looking at my nails the whole week. 


You don't need to wear a base coat before applying the polish, but i wore a coat of ridge filler just to make my ridges and imperfections not look as prominent - as metallic polishes tend to overexpose imperfections. 


To get the "Gel" look, pair the polish with the Miracle Gel Topcoat. Apply a coat of the topcoat and let natural light do the rest.
The topcoat is nice and smooth and glides right on the nail. It also doesn't smudge!
Apparently the gel topcoat cures and hardens using natural light, hence the more sunlight there is, the quicker your nails will dry. That's not to say it won't dry when its dark, it will just take a little longer. - dry time varies. I tend to paint my nails at night before bed, when there is no sunlight, and i found the polish takes the same amount of time as a standard polish to dry.
Game of Chromes alone is shiny and sparkly enough so you could probably get away without using the topcoat. But if you want to ensure long wear time you definitely need a coat of topcoat.
I personally don't think you even need this specific topcoat though. You could really use any topcoat over the polish - it just won't give your nails a  "gel"  look.


*  *  * 


I was surprised with how easy it was to remove with nail polish remover, whether it be acetone or non-acetone remover. It removes just like regular nail polish, so no soaking, wrapping or scraping is required. 
I did notice however that some silver shimmer residue remains on the nail, but it wasn't too hard to remove while washing hands.


Game of Chromes is a versatile shade great to wear all year round no matter the season and is sure to compliment any skin tone.

I am actually so impressed with Game of Chromes and cannot wait to try out some other polishes from the Miracle Gel range.

Definitely recommend getting  your hands on this polish - it's to die for!

*  *  * 
RRP: $16.95 (AUD)
(well worth the price - especially for Game of Chromes)

Find Sally Hansen polishes at these retailers: http://au.sallyhansen.com/store-locator

*  *  * 
*Disclaimer: CotyPR Australia kindly sent me these products for an honest review. All opinions expressed in this blog post are mine based on what i have experienced by trialling these products.

Thanks for taking the time to read this
Have a great day 
Doni xxx


Find me on:
Instagram ~ @donsnailobsession

Twitter ~ @donsnails

31 March, 2015

RIMMEL LONDON VELVET MATTE NAIL POLISH COLLECTION - SWATCHES & REVIEW

Discover a new take and finish on nails. Rimmel London have just introduced the new 'Velvet Matte' nail polish, the ultimate matte collection in the most opulent must-have shades of the season.

Who needs shine when you have nails with real matte-itude?!
Now for the first time, you can get matte Rimmel nail colour all in one bottle - no matte topcoat needed. Watch the formula go from glossy to a smooth velvety matte finish on the nail in seconds.

These Vampy shades are great for autumn / fall and winter - perfect for those of us currently in the southern hemisphere.


All four of these polishes have got really smooth and creamy formulas, are pigmented and cover really well and they're not streaky! 

This nail polish also dries instantly, so you are free to do whatever you want and not worry about smudging or dinting a nail - great if you're in a hurry. 

The colours are all pretty opaque and can be easy one coat wonders depending on how thick your coats of polish are. I found that one generous coat or two thin coats of polish will achieve full opacity with most of these polish colours. 
However, i personally believe to further enhance, build up and intensify the colour to make it look more vibrant ,  two - three thin coats are ideal.


*Tips for best results with application: 
  • You need to be quick with your painting swipes because the polish literally starts drying instantly. I found that  the more swipes of polish you play around with, the more you'll struggle with the formula.Ideally you should use the quick three stroke method of application - these polishes have a fantastic wide bush, so you could even get away with only one or two brush swipes.
Look at that brush!
  • If you are going to apply multiple coats of polish, ensure the first coat underneath is completely dry. 
  • I also found that the polish is easiest to apply with no base coat - the formula can be a little bit tricky to work with if you've used a base coat. The only issue with not using a base coat is that the matte nature of the polish exposes all ridges and imperfections on the nail, but with the more coats of polish you do, the less prominent the imperfections look. 

So...these polishes have pretty awesome formulas, dry super fast, require minimal coats of polish and they're matte - aah-mazing!


 *  *  *  

Here are some swatches of the Velvet Matte range: 

VELVET TOUCH   #013
Velvet Touch is a lovely dark grey nail polish colour. The formula is nice and smooth and the polish is not streaky.The polish colour is highly pigmented and covers really well.  
It takes one thick - two thin coats of polish to achieve full opacity. 
Grey polishes are really 'in' and trendy at the moment, so i definitely recommend adding this to your collection.

SUMPTUOUS RED   #014
Sumptuous Red is a dark crimson-purple-plum nail polish colour. It's a gorgeous colour. The formula is nice and smooth. The polish colour is highly pigmented. 
This polish takes one - two coats of polish to achieve full opacity. I found that the more coats used and built up intensifies the colour, making it look even prettier.
This colour is quite unique and i think an essential colour to have in your collection for autumn / fall.

MIDNIGHT KISS   #015
Midnight Kiss is a beautiful deep blue nail polish colour. The formula is perfect, nice and smooth.The polish is highly pigmented and covers really well. 
This polish takes one - two coats to achieve full opacity. 
This is such a stunning colour that looks great matte, but would also look amazing if a shiny topcoat were added. 

MATTE-ITUDE   #017
Matte-itude is a typical black nail polish colour. The formula is perfect - Nice and smooth and not streaky. The polish is highly pigmented and covers extremely well.This polish takes only one coat to achieve full opacity. 
Who doesn't love matte black nails? Personally speaking, i prefer matte black nails to shiny black nails. 


*  *  *  

If you're not a fan of the matte look, simply topcoat the polish with a shiny topcoat!
But why would you?! These colours look gorgeous matte. 
Matte polish vs adding topcoat and making it Shiny 
*  *  *

The polish only lasts two days or so without chipping and turning a little dull (less matte), that's due to the matte formula nature, so it's to be expected - but it's perfectly fine with me because the polishes dry pretty much instantly when applied, so why not just paint your nails everyday... like i do ;)

I am really impressed with these polishes and their formulas. I definitely recommend you pick up the whole range! 

Cannot wait to see Rimmel release more velvet matte shades!


*  *  * 

Find these polishes at these selected retailers: http://au.rimmellondon.com/where-to-buy-rimmel

RRP: $8.95 each (AUD)


*Disclaimer: CotyPR Australia kindly sent me these products for an honest review. All opinions expressed in this blog post are mine based on what i have experienced by trialing these products.


Thanks for taking the time to read this
Have a great day 
Doni xxx


Find me on:
Instagram ~ @donsnailobsession  - https://instagram.com/donsnailobsession/
Twitter ~ @donsnails  - https://twitter.com/donsnails


08 March, 2015

TOY NAIL POLISH - SWATCHES & REVIEW

Add a burst of colour to your day with TOY nail polish. 

TOY nail polish have great formulas and are highly pigmented, they're super shiny and glossy and are not streaky.

They also dry extremely fast! According to TOY it only takes approximately fifty seconds for the first coat of polish to dry and one and a half minutes for the second coat of polish to dry, with a total hardening time of only seven minutes - awesome!

I tried out some TOY polish manicures for a full week, without a topcoat and it resulted in some minimal chipping and just some general tip wear - amazing! With added topcoat it could even last double the time. 

Some other things you might be interested to know are that TOY cares for you and our planet. TOY nail polishes are not tested on animals and are 100% cruelty free. Their polishes are also 3-Free / free from commonly used toxic ingredients including Dibutyl Phthalate, Formaldehyde, Toluene, Camphor and acetone, and the actual nail polish bottles are made of recycled glass! How awesome is that?! 


*  *  *

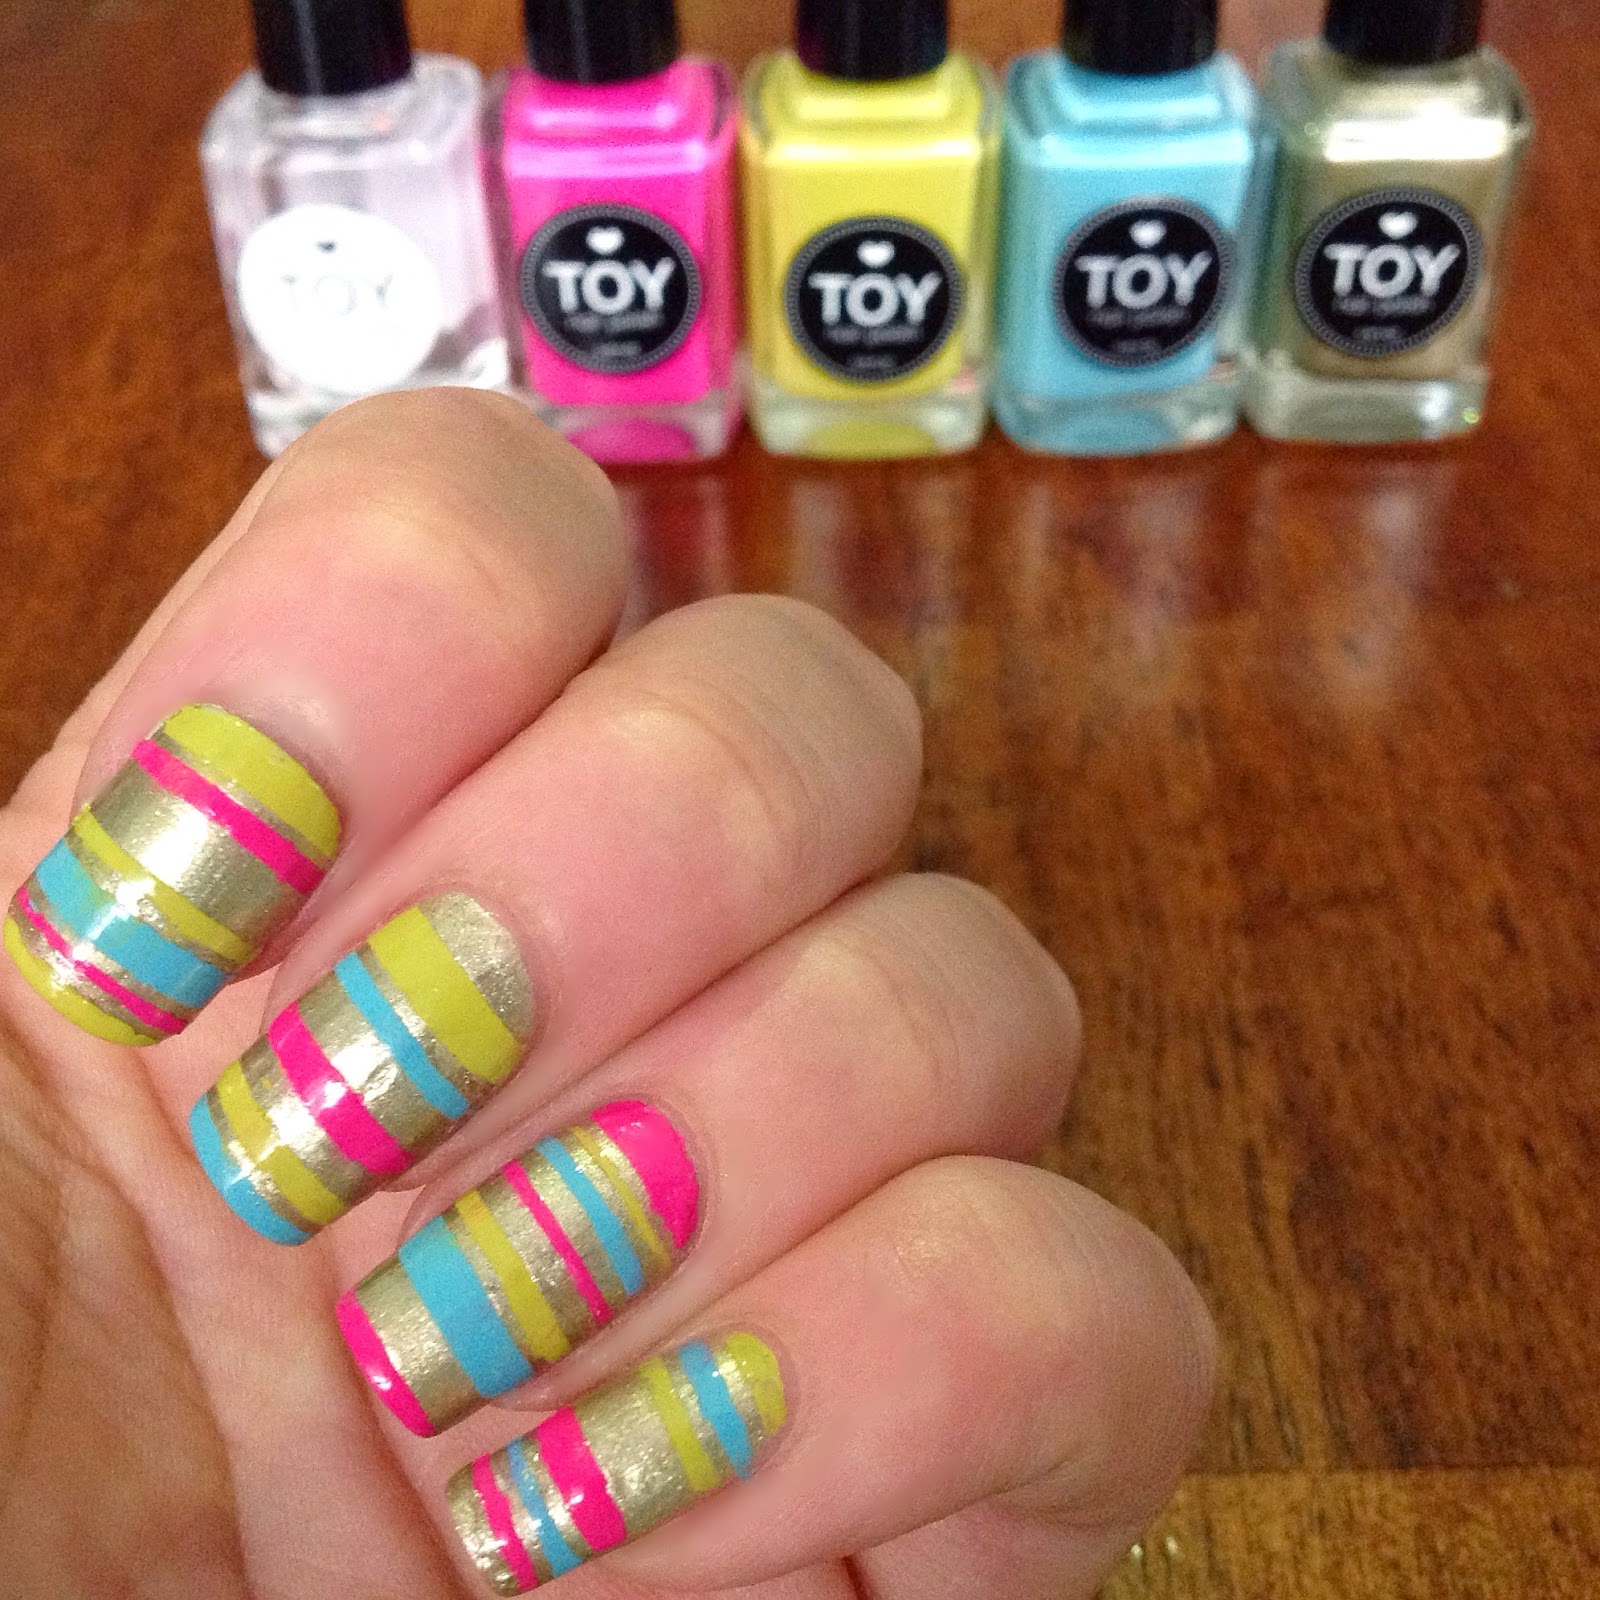
Here are some nail swatches of the colours i tried.

ROSADO NEON
Rosado Neon is a bright electric neon pink nail polish colour. This polish covers amazingly well and takes only one coat of nail polish to look opaque, provided you use a thick enough coat, otherwise two thin coats of polish will achieve full opacity - i find that the more coats you apply and build up, the more vibrant the colour looks. 
This polish colour is highly pigmented and has a perfect smooth and creamy formula, which is awesome especially for a neon polish. 
I love how bright this colour looks on the actual nail without needing a white base colour for it to look as bright as it does in the bottle (unlike most neon polishes i have tried in the past). The polish, like most neon polishes, dries semi matte but still looks great. You could go either way with this polish - leave it as it is or top it off with a matte or shiny topcoat depending on your preference. 
It's such a fun and bright colour great for summer.I seriously cannot say enough great things about this polish, definitely a 10 / 10 in my eyes - love it!  

LIMA
Lima is a creamy pastel green-yellow nail polish colour - the colour kind of looks like the inside of an avocado to me. This bold polish is highly pigmented and has a nice smooth and creamy formula. It only takes two thin coats of polish to achieve full opacity. The formula is perfect with even coverage with each coat of polish. 
This colour really has me stumped... it isn't a nail polish colour i would normally gravitate towards but i kind of like it...it just works. It's a colour you could get away with wearing all year round without it being too bright or too dark for a season in the year. 

AZUL CLARO
Azul Claro is an electric neon blue (kind of Aqua) nail polish colour. This polish has a nice smooth formula but appears a little more thin and runny compared to the other polishes - however this was not an issue as the polish applied perfectly, it was just a little more sheer. This polish takes two - three coats to become opaque depending on how thick your application of the coats of polish are. This polish is super glossy, even without a coat of topcoat. I love this colour, it's so vibrant and great for summer and spring to add a splash of colour to your day. When i wore this polish i got so many compliments and i totally understand why - it's gorgeous! 

DORADO
Dorado is a beautiful gold metallic nail polish colour with silver shimmer running throughout it. This polish has an amazing smooth formula that glides onto the nail. It only takes two coats to achieve fully opacity. The polish covers evenly with the two coats of polish with no issues of streak marks or patches. 
I'm a sucker for metallic polishes so i've tried a lot of them, but this has one of the best metallic formula's i have ever tried - i love it!
This is a great polish colour to add some bling and shine to your day. By even just painting one accent nail with this polish, it will surely add some sparkle to your day.

DIAMOND COCKTAIL - SHINY TOPCOAT 
Diamond Cocktail is a gel-like shiny topcoat...it actually is really shiny and glossy.  
This topcoat is so smooth and effortlessly glides straight onto the nail. One coat of topcoat applied to any manicure sets the colour, smooths the nail, assists in the longevity and wear of a manicure and provides instant shine. It is super glossy which i absolutely love and dries incredibly fast. Once your base nail polish colour has dried, the topcoat won't smudge any nail art or pick up the colour, creating the perfect shiny manicure. 
Your nails will literally glisten like a diamond - love love love it and definitely recommend! I've found my new go-to topcoat. It's just perfect!

* all nail pictures featured in this blog post are topcoated with this topcoat *  

*  *  * 
Here is some nail art i did using my new TOY's... 
  
*  *  * 
I'm seriously impressed with the quality of these TOY polishes and definitely recommend you check them out!

Find these polishes and more here: http://toynails.com.au/
* * * Use my code "trytoy20" for 20% off your order * * *

TOY currently have 19 nail polish colours and 2 topcoats available on their Australian online store. I'm looking forward to more colours being released as well as many more great things coming from them in the future. 
Connect with TOY on Instagram and Facebook for news, tips and inspiration -@TOYnailsAU

Peace.
Love. 
TOY nails

Disclaimer: The products mentioned in this blog post were kindly sent to me by TOYnailsAU for an honest review. All opinions expressed in this blog post are my own based on trial through manicures i have created with the products.

Thanks for reading
Have a great day
Doni xxx

Find me on:
Instagram ~ @donsnailobsession - https://instagram.com/donsnailobsession
Twitter ~ @donsnails - https://twitter.com/donsnails

11 February, 2015

BORN PRETTY STORE NAIL ART PRODUCTS - REVIEW & NAIL ART IDEAS

It's amazing how something so simple, quick and easy can transform a manicure into a work of art.

Create a manicure at home just as good as one you'd get done at Salon with these awesome Born Pretty nail art accessories.


*  *  *  *  * 

GOLD AND SILVER CIRCULAR NAIL STUDS
This Sectioned wheel contains 400 pieces of 6 different sized flat based gold and silver rounded studs.

These studs are three-dimensional, very round and spherical, more than any other studs i have ever used. What's really good about these is that they are plastic so they are very light-weight and they are also flat based so they can actually stick properly onto the nail. 

The lightweight nail studs can be adhered to the nail simply by applying a dab of topcoat or nail glue to the nail, then carefully applying the stud to the chosen spot. I find that sealing the whole nail with a coat of clear topcoat also assists in the wear time and longevity of the manicure and keeps the studs stuck on.
You may also be able to adhere the stud to the nail while the base nail polish colour is still quite wet, the stud will then stick in place when the nail polish base dries. 

*Using nail glue to adhere the stud will ensure that the stud sticks to the nail for a longer period of time than it would with topcoat, however I personally use topcoat (more specifically an old topcoat that has become quite thick) to stick the stud onto the nail and have no issues with this - the stud will usually remain adhered to my nail for about four-five days, provided i add a coat of topcoat over the stud and whole manicure and don't pick it off.

The six different sized studs in both silver and gold provide an easy and fun way to bling up any manicure with endless placement opportunities. 


BLACK NAIL ART PEN
I'm really not the best when it comes to using a nail stripper or brush, so this nail art pen makes nail art so much easier. The fine tip of the pen also makes it easy to control and draw precise lines - awesome!
I tried the black nail art pen and was pleasantly surprised with the quality of it. 
The ink is extremely fast drying and has a nice formula (not too runny or too thick). 
If you feel the pen is not releasing enough ink, a quick shake of the pen and light pressure when drawing should correct the ink flow.

*TIPS:
  • Don't use too much pressure when drawing with the pen - i accidentally did and it resulted in a small puddle of black ink on my finger! 
  • Make sure your base nail colour is completely dry and topcoated before using the nail art pen to avoid the pen picking up the base colour and making a mess.

When attempting any kind of nail art i hate it when i make a mistake and try to fix it and just make everything worse. Well with this nail art pen it is seriously mistake-proof which is awesome! It's surprisingly so easy to remove if you make a mistake. If you do make a mistake with a design created with the nail art pen you can simply wet a cue-tip with water (provided the ink from the pen is still semi wet) or nail polish remover, rub it gently over the mistake and viola the mistake is wiped away and you can start again!

These nail art pens are available in 16 colours - in literally every colour you could imagine.  
I am definitely planning to purchase one in every colour. Love them!  


Find this nail art pen here: http://www.bornprettystore.com/sell-fast-nail-quick-drawing-paint-polish-pens-p-17645.html  (colour #2) - product ID: #17645


MATTE NEON GLITTER
I'm a sucker for anything neon so there was no doubt that i would love these. 

These awesome circular glitters come in a neon colour mix of pink, purple, yellow, green, blue, orange and coral and mixed in two different sizes. The glitters are matte which also gives them a nice unique touch.

The glitters are nice and thin so they are quite easy to work with and stick to the nail.

The glitter can be stuck to the nail easily while the base nail polish colour is still wet or by using a coat of topcoat, then placing the glitter on (while the topcoat is wet). Seal in the glitter by applying a coat of clear topcoat over the nail.

This glitter is super easy to use and perfect for individual glitter placement.
Manicure possibilities are endless with these glitters, you could really do anything with them to add a pop of colour to any manicure.

*Manicure ideas: place the glitters randomly all over the nail (like i did), add them to a nail art design you've created or even create a glitter gradient. 


*  *  *  *  * 

Born Pretty have got you covered for all your nail art desires and needs.
Find these products and many more here: http://www.bornprettystore.com/ - 
use my code "XMG10" for a 10% discount on your purchase. 

The Born pretty store are always having sales so check out their website for awesome deals. They also offer Free shipping worldwide with no minimum spend required! 


Disclaimer: The products mentioned were kindly sent to me from the Born Pretty Store for an honest review. All opinions expressed in this blog post are my own based on trial through manicures and nail art i have created.


Thanks for taking the time to read this
Have a great day
Doni xx


Find me on:
Instagram ~ @donsnailobsession - http://instagram.com/donsnailobsession
Twitter ~ @donsnails - https://twitter.com/donsnails